

Step by Step Guide to Braiding Your Horse's Mane and Tail
Updated:
July 1, 2026By April D. Ray
Braiding a horse’s mane and tail is a tradition with deep historical roots. Originally, it served a very practical purpose—keeping the mane from getting caught in tack, tools, or the weapons used by mounted hunters and soldiers. According to old legends, fairies were believed to sneak into barns at night and weave “elf knots” into horse manes to ride them. A more sinister version of the tale suggests that thieves would tie knots in a mane to mark horses they planned to steal. Over time, braiding also came to symbolize class, with neatly plaited manes and tails identifying horses of high breeding or importance.
In modern equestrian life, braiding continues to serve a functional role in preventing tangles. It’s most commonly associated with horse shows, where the style and placement of the braids often reflect breed standards, riding disciplines, or rider preference. Neatly done braids enhance a horse’s turnout and convey pride in presentation and care.
In the show ring or out on course, braiding adds a finishing touch that demonstrates commitment to horsemanship. Whether in dressage, hunters, or breed-specific classes, carefully placed braids are a mark of respect—for the judge, the sport, and most importantly, the horse.
Regardless of the type of braids you plan to do, start with a clean mane. While some might argue that it’s harder to braid squeaky-clean hair, no one wants to put hours of work into braiding only to have the end result spoiled with dander and dirt. If a clean mane is too hard to work with, there are spray products on the market that can help make it more manageable, or even just a sponge and water can do the trick.
Making sure the mane is the right length and thickness for the specific type of braid you plan to do will help immensely, whether you’re going for short and tiny hunter braids, big fluffy dressage braids, or neat and tidy jumper braids. Lastly, a horse that will stand still and tolerate being pampered will help make your braiding job much easier and enjoyable for everyone involved.
Related: How to Train a Horse's Mane
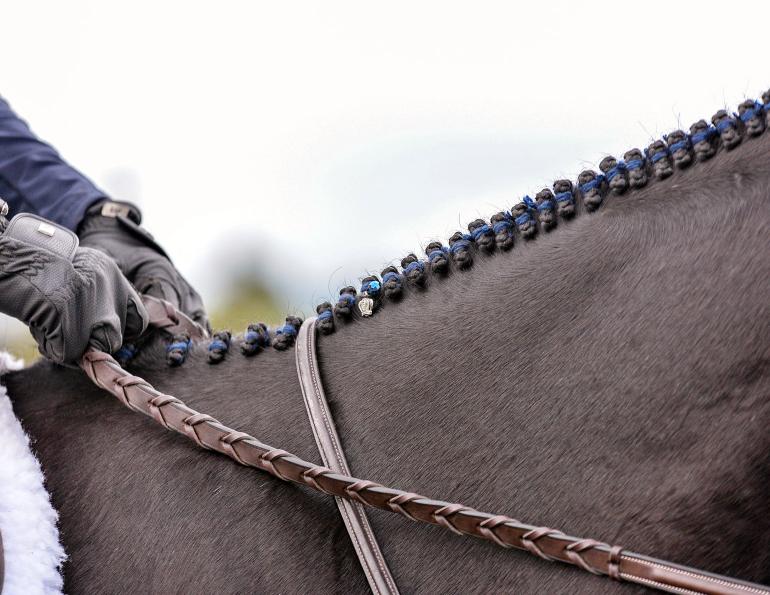
HUNTER BRAIDS
Hunter braids should be uniform, short, and plentiful. Depending on the size of the horse and thickness of the mane, you want between 30 and 40 braids to accent the horse’s neck. To achieve this look, you will need a mane that is even in thickness and short, between four to five inches in length.
You will need:
- Wool/yarn to match the horse’s hair (I used bright blue for visibility) - cut in lengths of about 24 inches. I wrap the wool around my arm and through my thumb to measure, then cut at the top (Photo 1)
- Mane comb
- Hair clip to hold back hair (I use a long plastic mane comb to divide and hold back the hair all-in-one)
- Pull-through
- Large plastic sewing needle
- Scissors
- Sponge and water or spray
- Braiding kit to hold your tools (Photos 2 and 2a)

Step 1 - Braid down
Start at the top of the mane and section off a small amount of hair. Your first braid is an important one as it sets the size for all the rest. Each braid should match in size and length; make sure each braid is tight and that you are pulling down close to the neck and not up away from it. This will ensure that your braids lay close to the crest of the neck and won’t stick up in an unsightly manner. Once you have braided down the section about two-thirds of the way, you want to add the wool by laying it perpendicular to the ground in the middle section of the braid (Photo 3). Meticulous braiders will note how many crossovers they have made in the braid before they add the yarn, giving a consistent look to the finished job.

Once the yarn is laid across, make one pass of each of the three strands of the braid and then pull down the top section of the wool to join the section of hair with the bottom of the wool (Photo 4) and continue braiding almost to the end of the hair. Here you want to wrap the wool around the bottom of the braid, pinching the end with your fingers while knotting with your other hand to prevent the braid from coming undone (Photo 5). Continue to braid the entire mane in this manner, making sure that each braid is the same size in both width and length (Photo 6).

Step 2 - Pull Up
Take your pull-through and start at the top of the mane with the first braid. Push the pull-through through the middle of the braid, hook the wool and close the hook (Photos 7, 8, 9). Pull the wool out through the top of the braid and repeat until all the wool in each braid is now on top of the mane (Photo 10).


Step 3 - Bobble
Going back to the first braid, make sure that the braid is pulled up tight to the top without coming through (Photo 11). If it does come all the way through, no worries, just pull it back down and try again. Once the bottom of the braid is tight to the top, cross the wool and place it under the braid in a single knot (Photo 12). Take the wool over the braid and tie a surgeon’s knot. You can use your thumb or finger to bump up the top of the braid to create a small bobble and pull the knot tight once you have it in the right spot (Photo 13). The surgeon’s knot will keep it in place, and you can now place a double knot under the bottom of the braid to further secure it (Photo 14). Trim the wool behind the braid so the ends of the wool can be hidden behind (Photo 15).


Forelock
A simple French braid can be done in the forelock, starting with three sections at the top, and adding small amounts of hair on each side as you braid down. Once you have run out of hair to add, braid a regular three-strand braid to the end, securing with a knot as you did with your mane braids. At this point, I like to use a large plastic needle to pull the wool through to the top of the French braid (Photo 16). Thread the ends of the wool through the eye and push the needle up through the braid in the middle and closest to the top of the braid as possible. Tie two knots and cut the ends off close to the knot for a clean and tidy look (Photo 17).


Related: How to Tidy-Up Clip - Face, Bridle Path, Legs
Tail
While braiding the tail isn’t mandatory for most hunter classes, it truly finishes the look. As with the forelock, do a French braid starting at the top with three sections and adding small pieces of hair as you braid down the tail (Photo 18). The braid should be just an inch or two shy of the end of the tail bone. Once you have reached the desired spot to finish the braid, braid down enough hair to wrap around the tail once or twice. Add in a piece of wool as you did with your braids in the mane, and finish with a knot (Photo 19). Wrap the end of the braid around the tail and tuck the end of your braid under the wrap so the loose hairs at the bottom of your braid join the rest of the tail (Photo 20). Here you can make a double knot around the wrap by taking one piece of wool through the top and one through the bottom and cut off the loose ends. I usually take a piece of that wool and thread it through the wrap of the tail on the opposite side and double knot it to further secure the tail braid (Photo 21). You can also put a few knots in the middle of the braid in a couple of spots starting from the top to ensure it stays in place all day (Photo 22, 23). Keeping the tail wrapped in a tensor bandage until ready to show will keep the finished tail braid clean and intact (Photo 24).


JUMPER BRAIDS

Photo: JIA Photography
Jumper braids can be sewn in, but for this article I will use elastics, which are much easier to use and to take out. Like dressage braids, you want jumper braids to be big, finishing with around 11 to 17 braids. Braids that are even in both thickness and length will improve the end result.
You will need:
- Braiding elastics to match mane (I used brown for visibility)
- Comb
- Spray bottle or sponge
Start braiding at the top of the mane with a large section of hair, going nearly to the bottom of the mane where you can secure with a braiding elastic. I like to tuck in the ends of the braid here as I find it easier to hide those ends rather than leaving them loose (Photo 1).
Related: Using Clippers for the Perfect Tail

Once the mane is braided (Photo 2), go back to the first braid and fold it in half, then fold in half again, creating a button (Photo 3). Take another braiding elastic and go around your button at least twice to secure (Photos 4, 5, 6). I like to use two elastics to do this in case one breaks, ensuring the braid won’t fall out. Continue this to the end of the mane.

I prefer the look of a loose forelock with jumper braids, but if you prefer to braid the forelock do a simple French braid and secure with an elastic, then button up the ends and secure with two elastics just as you did with the mane braids (Photo 7).

(Photo 8) Finished Jumper braids.

DRESSAGE BRAIDS

Although you can do dressage braids with elastics, I will sew them in for this article. While it can take a little longer than using elastics, sewing will better secure your braids and give a slightly cleaner look. Compared to hunter braids, which should be small and plentiful, dressage braids should be large and limited, preferably an odd number between 11 and 17. The mane doesn’t need to be too thin or short for these braids, but should be even in length and thickness.
You will need:
- Comb
- Wool to match mane, cut to lengths of about 24 inches
- Spray bottle or sponge to wet mane
- Large plastic sewing needle
- Scissors
Start braiding at the top of the mane. To help achieve a fluffier look, start the braid up and away from the neck (Photo 1) for the first three or four passes, and keep it loose. Then braid down about two-thirds of the way to where you will add the wool by laying it across the braid perpendicular to the ground, adding the bottom side of the wool to the middle strand of your braid (Photo 2). Complete one pass of your braid until the strand with the wool is in the middle again and pull down the top of your wool to join it (Photo 3). Continue braiding to the end of the hair and secure with a knot (Photo 4).
Related: Saddle Comfort and Trail Riding - Between You and Your Horse


Once your entire mane is braided (Photo 5), take your sewing needle and pull the wool through the top of the braid (Photo 6). Keeping the needle in, fold the braid in half (Photo 7), and then in half again (Photo 8), creating a button. Holding it in place, take your sewing needle, and sew the braid in place (Photo 9). Make three passes back and forth through the braid, finishing at the front, where you can secure with a double knot and cut as close to the braid as possible (Photo 10).


You can braid the forelock if desired and either secure with wool as in the Hunter Braid How-To, or with elastics as in the Jumper Braid How To.
As with most activities involving horses, practice makes perfect. Braiding takes lots of practice to achieve that ring-ready look. You can braid for your lessons or in your spare time at the barn. It’s also good for your horse to learn to stand still rather than adding a fidgety, hard-to-braid horse to your nerves on horse show day.
Related: How to Keep Rain from Ruining your Leather Tack
Related: How to Shorten a Horse's Mane with Scissors
All photos are by Donald Peterson unless otherwise noted.
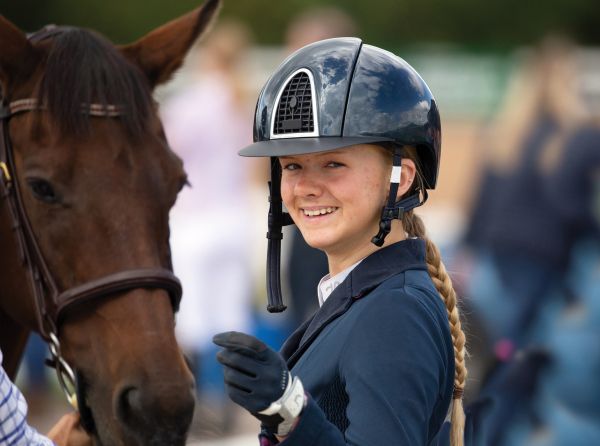
Main photo: Hunter braids. Photo: Soul Touch Photography

Blogs & Podcasts

Advertisement

Related Articles


Advertisement

Featured Stories


Advertisement
