Finishing Your Fence: Installing Tensioned & Electric Fencing

Updated:
March 20, 2012By John Ferris, Full Dip. Tech., Prod. Eng.
Your fencing project is ready to be finished off with the fabricating material. This can be done with traditional wood rails, but popular options these days are tensioned materials such as polymer coated wire, vinyl rail, wire mesh, or electric due to their low maintenance requirements, ease of installation, and economical cost. One thing these products have in common is the need to be installed and tensioned properly in order to be both safe and effective.
Setting the Tension
To begin, place a string line from the top of your starting post to the top of the next post in the position where the top strand or upper edge of the material will sit. Gently follow the contours of the land as the end product will be much more pleasing to the eye. It is very important to keep the string line tight and held temporarily in place by a staple.
Stand back 50 feet or more and take a look. Make sure you are happy that the top line is going to provide safety and the aesthetics you require for your installation. Continue to mark off all the strands and rails at the spacing required or that works out equally for the height of the fence. Avoid strands or rails too close to the ground as this creates an area where horses can become cast or catch their heels, shoes, etc.
Having achieved a string line template to your satisfaction, take your fencing material out and fasten it to the post at the end point and then at the predetermined places along the fence (product installation instructions will help you with this).
Remember that any material that has to be tensioned cannot be pulled tight enough by hand — a tensioning or pulling tool must be used to achieve a tight fence. There are a variety of tensioning accessories available to make the tightening of a fence much easier. there are also quick and neat wire joiners available to make joining a much easier and cleaner job as well.
If you are tightening strands or tensioned band fence (e.g. electric tape or vinyl rail), for final tightening always tighten the bottom strand first and work upwards. If you tighten in reverse, by the time you do the bottom strand the top strand will be loose.
If you are tensioning no-climb mesh or v-mesh fencing, remember to pull the fence equally, that is, the top and bottom together. I use two 2”x6” wood rails which bolt together to form a clamp. Attach this safely to a stationary object in line with the pull. This method enables you to adjust the tension to ensure all the horizontal wires of the fence pull correctly to eliminate any bellying.
The Electric Option
Electric fencing is now an accepted part of farming operations throughout the world. It is heartbreaking to see new wood and posts being chewed, gates being struck at, manes getting rubbed, and animals getting into bad situations because they are bothering their neighbours! This is especially a problem in smaller paddocks where very often there is nothing to occupy the animal’s mind. To keep fences looking good, notably in high stress areas where an animal is particularly hard on a fence, electrification is often the solution recommended for extra safety and protection for the fence and, more importantly, the animal.

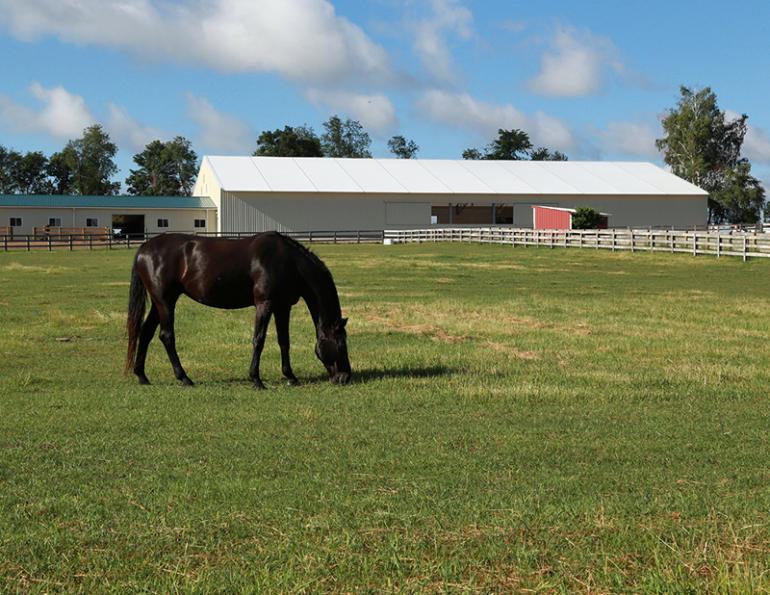
You can combine fencing materials in order to create the best fence for your individual situation. This farm has opted for wide vinyl strips with electric on the inside to protect the fence. Photo: Pam MacKenzie Photography
An electric fence works by “educating” the animals so that they learn to associate touching the fence with receiving an unpleasant shock. The source of the shock is an electric fence controller or energizer which provides regular pulses of electricity to your fence. When an animal makes contact with the fence, it becomes part of an electrical circuit between the output terminals.
Electric fencing has universal application. It will contain all types of domestic animals and is a positive deterrent to wildlife. Educated livestock develop a greater respect for electric fencing than for any other types of fence. This respect means that fences won’t be subjected to the same physical pressure from animals as other fencing types, which therefore greatly extends the service life of both the electric fence and existing permanent fences. Other advantages include being low cost and easy to install.
Electric fences also provide flexibility: there is no quicker or easier way to effectively subdivide a paddock for controlled grazing than with an electric fence. Once your fence is properly installed and your stock have learned to respect the fence, the maintenance requirements are very minimal. Most importantly, your livestock has greater protection.
The Fence Controller or Energizer
There are three types of controller to choose from to suit your individual situation: mains (run from hydro), battery, and solar.
Where possible, a mains type is the preferable way to go as you do not have to purchase batteries, worry about dead batteries, or worry about lack of sunlight over the long dark days of winter. Solar controllers work wonderfully well in areas that experience bright winters; I also have customers who use these machines most successfully to protect their beehives from bears during the summer months — a good application of solar power. Battery controllers are the answer when hydro power just cannot be made available close enough to the fence line. Of course, the small battery units are wonderful for overnight accommodation if you wish to set up temporary corrals. For permanent electric fencing it is usually advisable to use a mains-powered controller.
Some controllers are labeled as “low impedance” controllers. These maintain higher voltage and energy levels as fencing conditions become more difficult. With increased energy output, they compensate for and overcome shorts or energy drains caused by heavy vegetation, fences in poorer conditions, and long fence lines.
Installation of the Mains-Powered Controller
Any mains-powered energizer should be installed in a sheltered position, preferably inside a building. This is simply a safety measure. All the output leads from the energizer to the fence should be made with insulated galvanized wire. This includes the earth (ground) connection if there is one. This is not only safer, but it can be installed underground, overhead, or through walls without worries of short-circuiting, and it can be run through staples to be neatly installed out of the way.

Electric Fence Controller Setup
Care must be taken that the output wires never come in contact with the building, especially is if it made of steel or is used to house flammable materials. If the pulsed wire touches the building, the whole structure may be capable of delivering a powerful shock or causing dangerous sparks. If the earth wire touches the building, the same shock can occur under certain circumstances (e.g. broken earth connection, bad earth, or short-circuit on the fence). The output wires should be kept well clear of any power lines or water pipes around your home.
Types of Electric Fencing Systems
There are three basic electric fence systems: earth return, fence return, and bi-polar.
Earth Return System
Earth return is the most commonly used electric fencing system and is effective when the ground is not too dry, too frozen, or too hard to drive in ground rods.

This system uses one or more fence wires to deliver the pulse from the energizer.
To complete the circuit, current must flow through the animal and back to the energizer by way of the earth (ground). This system therefore relies on the animal making good electrical contact with the ground, and the ground being sufficiently moist to provide a low resistance circuit back to the energizer earth terminal.
Always read the instructions that come with the fence controller. Make sure the connections to the controller are correct; it is very easy to be in a hurry and switch the ground connection wire with the fence connection wire! Try to place the connection rods on the north side of a building where there is a constant shade to maintain more moist ground and preferably by a downspout for added dampness. Always use a non-corrosive rod (I like galvanized) and try to get it six to nine feet in the ground.
Many fence controller manufacturers recommend three ground rods; if possible use three rods especially when you are using low impedance controllers and energizing long lines.
It is also recommended that on very long, multi-wire fence lines, to improve the grounds, additional ground rods should be installed along the length of the fence. Choose one strand of the wire fence to be the ground wire, and connect it to the ground rod. At one quarter mile intervals, drive in additional ground rods and attach them to this wire. If you are having grounding problems, consider single versus multi-wire; a single wire fence will work well for short fence lengths and for moist ground conditions, but longer fences should be multi-wire (two or more strands) to accommodate the additional grounding.
Fence Return System
In order to overcome the problems associated with earth return systems, fence return may be used.

This system uses both pulsed and earth wires in the fence, thus requiring two or more wires.
To complete the circuit, the current must flow through the animal from the pulsed wire to the earthed wire and back to the energizer. If the ground is sufficiently moist for the earth return to work, the animal will receive a shock by touching only the pulsed wire.
If the earth return is not working, then the animal will receive a shock when it pushes far enough through the fence to contact two adjacent wires, one pulsed, one earthed.
The animal will not receive a shock if it touches only the earthed wire.
Bi-Polar System
Bi-polar fencing is an electric fencing system designed in Australia specifically for Australian conditions, but of course can be applied in extreme dry or cold situations elsewhere in the world.

Its application is for certain circumstances and is probably not necessary in most situations. One must remember that a bi-polar energizer must be purchased to run this system and they are more expensive and less available.
However, bi-polar systems also have advantages, which are:
- Every wire can be energized.
- The fence is protected against short-circuits as other wires will remain effective. Conversely, if a live wire short-circuits on a conventional fence, every wire on the fence is affected.
- Fewer insulators are required because each wire shares in carrying half of the output with respect to the ground.
- More effective with hard-to-fence animals such as feral and heavily coated stock. If an animal touches both the positively and negatively charged wires it will receive a double strength shock.
- More effective to use with very heavy weed growth.
Setting up Electric Wire
Think of the electric current running to and along your paddocks the same way as you would set up irrigation. Run out with a single line, preferably with insulated cable as mentioned previously, and branch out from that central line. Remember it is preferable to run from the controller with a larger diameter wire out to a small diameter wire as there will be no interference with the voltage. However, if you run from small to large you will lose voltage.
It is very important to use the correct insulators for the type of wire being electrified. For tape, use tape insulators so that you are not scrunching it into a strand type insulator. At every corner you should use a corner insulator so that the tension can be strained around the corner and maintained tight. Avoid the temptation to wrap the wire around and around the insulator to take up the tension! If you intend on putting a lower wire on the fence line, you may wish to think about placing a small diameter polywire as this would have a better chance of breaking in the event an animal did get caught. The larger diameter, more visible polywire or tape is ideal for top strands.
When joining electric polywire, peel back the poly strands and pigtail the metal wires; join the poly with a good reef knot to take the strain from the pigtailed wire. There are also joiners and crimp systems available on the market.
Also take into consideration whether you wish to have the gates protected by electric. If the gates are not a high risk item for damage by or to livestock, it is very convenient to go under the gates with insulated cable. Simply run a length of cable to about the depth of nine to twelve inches underground beneath the gate having sufficient cable staples up the gate posts to join to the electric wire.
Once the electric lines are in place, it’s important to check whether your fence is working rather than guess – using the kids or the dog is not very foolproof! Troubleshoot your electric fence installation to make sure it is working to maximum voltage.

It’s important to use the proper insulators for the type of electric fencing you have. Avoid wrapping the wire or tape around the insulator to take up tension. Use a tensioning device to pull the product taught. Photo: Pam MacKenzie Photography
Everyone with an electric fence system should have an electric fence tester, which reads 600 volts to 10,000 volts (please note that one light-type testers are not sufficient, and household voltage meters will not read electric fence voltage). The following troubleshooting procedures will determine if fence controllers are non-functioning:
Directly a drop in voltage out on the fence line is detected:
- Disconnect the fence and grounding system from the fence controller and test it without load by placing the grounding fork of the fence tester on the ground knob and the metal strip at the top of the tester on the fence knob. If a reading of approximately 6000-plus volts is present, the fence controller will be able to have output to the fence.
- If the fence controller has good output, connect up the fence and grounding and put it under load. Check the ground rods for leaking voltage by putting the ground fork of the tester into the ground and the metal strip at the top of the tester onto the ground rod – this reading should be “0” or at most a very low voltage reading of say 400 volts. If there is a significant reading, more ground rods must be added at least 10 to 16 feet apart and linked together with galvanized wire and clamps. Fence controller manufacturers recommend a minimum of three ground rods be used. (Remember – standard duty fence controllers will drop significant voltage if there is an infestation of weeds creating numerous shorts, whereas a low impedance fence controller will maintain good voltage through fairly major shorting via weeds, etc. Please do not expect a standard duty model to perform the same through weeds as a low impedance model – a “clean fence line” is always the best fence line!) Note: Household copper wiring must not be used for any connections to grounds or fence – use 12.5 galvanized wire (preferably insulated) for the lead out connections.
- If you are happy that the grounding is working properly, proceed methodically along the electric fence line with the tester and if there is a drop in voltage look for the problem, such as breaks in the conductors (aluminum and copper conductors can break down), major faults/shorts such as the electric fence touching metal gates, waterers, page wire, chain link, etc., or a tree or branch that has come down on the fence.
- All posts must have insulators despite what some electric fence companies recommend – you would be amazed how much voltage will go to ground via the copper in treated posts, and metal posts, etc.
- Use the correct corner and tensioning insulators and the tape insulators for electric tape because arcing and shorting can occur if wire or tape is wrapped or crumpled, which may result in the conductors burning through and creating a break in the voltage.
In addition to the fence testers there are fence alerts available at a very reasonable price which are installed on the electric fence wire or tape and begin flashing a bright red light as soon as the voltage goes low or quits altogether. An electric fence tester (and a fence alert) can save you a great deal of trouble, time and expense.
Once you have checked the controller and the ground rods, hook up the fence to the controller and begin going around the fence line. A minimum of 2500 volts is required to effectively control horses. Ideally, you want to maintain voltage as high as the controller is capable of putting out. The voltage tester will be of great assistance in assessing where problems start, thus making the repair much easier.
At any point in your fence system, you can install a cut-off switch to isolate paddocks or a particular part of the system. You also do not have to complete a circle of fence to complete a circuit. In other words your electric wires can dead-end.
Safety Tips
When training horses to the electric fence, take particular care that they have plenty of room to run when they first experience an electric fence and bear in mind your own safety: be out of the way when they get that shock! Make sure there are no obstacles in the vicinity for the horse to run into.
Part of the standard for electric fencing calls for warning signs to be placed at intervals along any section where “members of the public might come into contact with same.”
During lightning storms you should disconnect the controller form the fence and unplug it from the wall. Lightning arrestors are also available.
Make sure there is no chance for the pulsed wire to contact your phone lines, television aerial, or any household water lines or utility lines. If you are planning to run a wire below overhead power transmission lines, you should seek the advice of your power authority. In the event of a fallen power line, your whole fence system can become lethal. Never use any part of your household wiring or plumbing as a ground for your electric fence!
Author John Ferris and his wife Lesley have operated Ferris Fencing for more than 20 years, specializing in equine, general farm, horticulture, and vineyard applications, complete electric systems, and electric nets. As farmers, horse owners, and engineers, they are experts in the technical aspects of installation and application of fencing systems. For more information, visit www.ferrisfencing.com.
Main article photo: Electric fencing is an excellent option for splitting up large pastures or paddocks into smaller areas to be used in rotational grazing or other management systems. Pam MacKenzie Photography
This article originally appeared in the July/August 2010 issue of Canadian Horse Journal.
Blogs & Podcasts

Advertisement

Related Articles


Advertisement

Featured Stories


Advertisement